How to Scrape ChatGPT: Input Prompt, Harvest Response
You’ve heard about using ChatGPT to scrape the internet. But what about scraping the LLM itself? Naturally, you can’t just break into the servers and rake over whatever passes for its brain. But you can scrape the ChatGPT responses to your outputs. In fact, you can automate the whole process – including feeding it the prompts. We’ve prepared two methods to let you do just that.

Why Scrape ChatGPT Responses?
Your uncle trusts ChatGPT data because Google has become increasingly annoying to use due to various changes made to make Search generate more revenue. But there is interest to be had in just what ChatGPT tells you. You may try to scrape the AI’s responses to:
- Track your ChatGPT mentions: Previously, your visibility online was very much determined by Google SERP. Those days are rapidly going away as users turn to ChatGPT for their search purposes. Now, to know whether your product ranks, you need to learn whether ChatGPT thinks it does. By programmatically scraping ChatGPT, you can quickly test it with a variety of prompts relevant to your case.
- Monitor the competition: your product isn’t the only one appearing on ChatGPT – if it were, you wouldn’t be reading the article. But by scraping ChatGPT answers about your niche or the specific competing product, you can gain insight into what tactics the competitors use to appear in AI responses.
- Optimize for AI: SEO was a game of reading bird entrails: looking at SERP results and comparing content that ranks with what doesn’t. With ChatGPT, the approach is similar. Scraping such data en masse will allow you to get a clearer picture of what you need for your product or service to rank higher in the “eyes” of AI.
- Shape AI training: maybe you have a local model running that needs attention? By having an automated GPT response scraping pipeline, you can quickly compare its responses to ChatGPT output and quickly see where it has issues.
Method 1: Build a ChatGPT Scraper from Scratch
This method shows you how to build a simple ChatGPT scraper from zero. It uses a headless browser (they’re unfortunately necessary) to open a logged out page, enter a prompt, and download the output in Markdown.
To scrape ChatGPT response, we’ll be using Python. Our example is written with the assumption that you already have Python installed on your system.
The whole process will be carried out in the command line. For Windows users, the command line interface is commonly known as CMD (Command Prompt). For Mac or Linux users, that will be Terminal.
Preliminaries
Our script will need the following libraries and tools to work:
- Camoufox: an open-source anti-detect browser based on Firefox.
- Markdownify: a tool to convert the output into Markdown.
- Proxies: they’re optional. But if you’re planning to scale your scraping, you’ll need proxy servers to avoid getting rate-limited.
Discover top proxy service providers – thoroughly tested and ranked to help you choose.
To install Camoufox, open the command line first. Then:
- For Windows, enter the line:
camoufox fetch
- For Mac, enter the line:
python3 -m camoufox fetch
- For Linux, enter the line:
python -m camoufox fetch
- For fresh Linux installs, you may also need to install the following dependencies.
- On Debian-based distros:
sudo apt install -y libgtk-3-0 libx11-xcb1 libasound2
- On Arch-based distros:
sudo pacman -S gtk3 libx11 libxcb cairo libasound alsa-lib
To install Markdownify, open the command line. Then enter:
pip install markdownify
Putting the Code Together
Once you get to the finished Python code example, you should download it and save it as chatgpt_scraper.py.
We start by importing the tools we’re going to use: Camoufox, Markdownify, and the logging functionality. We also set up the query that will be entered into ChatGPT.
					from camoufox.sync_api import Camoufox
from markdownify import markdownify
import logging

query = "What are the top three dog breeds?"
The output_file line shows what the text file with the scraped response will be called. Running the code several times will overwrite this file, so make sure to save any data you want to keep.
output_file = "output_md.txt"
These lines are where you enter, respectively, the URL of your proxy server, your proxy username, and password.
We also set up a 60-second timeout limit.
					proxy_server = "XXX"
proxy_uname = "YYY"
proxy_pass = "ZZZ"

timeout = 60_000
The following defines the CSS selectors, starting with the URL of the page. The selectors will be used to detect the window for text entry, the button for submitting the query, and the section with the response.
					url = "https://chatgpt.com/"

selector_textarea = "div#prompt-textarea"
selector_submit = "button#composer-submit-button"
selector_response = "div.markdown"
We also set up logging – if anything breaks down in the scraping process, this will help us find out why.
					logging.basicConfig(filename="chatgpt_scraper.log", level=logging.DEBUG)
logger = logging.getLogger(__name__)
Here we have the code to reach ChatGPT, scrape it, and return the results. First up, we try to access the page and set up a log message in case that doesn’t work.
					def scrape(url: str, page: Camoufox) -> None:
    try:
        response = page.goto(
            url,
            wait_until="domcontentloaded",
            timeout=timeout)
        if response and not response.ok:
            logger.warning(f"Page returned status code: {response.status}")
The code now uses the selectors we defined to:
- Find the text entry field in the ChatGPT window.
- Fill in the query.
- Find the button to submit it.
- Click the button.
- Wait for the response.
- Find and extract the response.
Additionally, appropriate messages are created to inform you of any failures.
        textarea_elem = page.locator(selector_textarea)

        if not textarea_elem:
            raise Exception("Textarea element not found.")

        textarea_elem.fill(query)

        submit_button = page.locator(selector_submit)

        if not submit_button:
            raise Exception("Submit button not found")

        submit_button.click()

        page.wait_for_load_state("networkidle", timeout=timeout)

        response_elem = page.locator(selector_response)
        if not response_elem:
            raise Exception(f"Response element with selector '{selector_response}' not found")

        response_text = response_elem.text_content()
Next up, we set the scraped data as the output, which is then converted into Markdown and saved as a file. There’s also the appropriate error logging setup.
					        print ("Output: ")
        print (response_text)

        response_md = markdownify(response_elem.inner_html())
        print ("Markdown:")
        print (response_md)

        if not response_text:
            logger.warning("Response element is empty")

        write_output(response_md)

    except Exception as e:
        logger.error(f"Scrape failed: {str(e)}", exc_info=True)
Finally, here’s the setup for running Camoufox. That’s where the proxy logins are actually used.
The headless = True line sets Camoufox to run, well, headless. You can set it to False instead if you want to see it in action.
					def main() -> None:
    with Camoufox(geoip=True,
        proxy={
            "server": proxy_server,
            "username": proxy_uname,
            "password": proxy_pass,
        },
        headless = True,
    ) as browser:
        page = browser.new_page()
        scrape(url, page)
        browser.close()


if __name__ == "__main__":
    main()
The Finished Code Example
Putting it all together, the full code for scraping ChatGPT response looks like this. Remember to save it as chatgpt_scraper.py.
					from camoufox.sync_api import Camoufox
from markdownify import markdownify
import logging

query = "What are the top three dog breeds?"

output_file = "output_md.txt"

proxy_server = "XXX"
proxy_uname = "YYY"
proxy_pass = "ZZZ"

timeout = 60_000

url = "https://chatgpt.com/"

selector_textarea = "div#prompt-textarea"
selector_submit = "button#composer-submit-button"
selector_response = "div.markdown"

logging.basicConfig(filename="chatgpt_scraper.log", level=logging.DEBUG)
logger = logging.getLogger(__name__)

def write_output(response_md: str) -> None:
    try:
        with open (output_file, "w") as f:
            f.write(response_md)
    except Exception as e:
        logger.error(f"Write failed. Error: {str(e)}", exc_info=True)

def scrape(url: str, page: Camoufox) -> None:
    try:
        response = page.goto(
            url,
            wait_until="domcontentloaded",
            timeout=timeout)
        if response and not response.ok:
            logger.warning(f"Page returned status code: {response.status}")

        textarea_elem = page.locator(selector_textarea)

        if not textarea_elem:
            raise Exception("Textarea element not found.")

        textarea_elem.fill(query)

        submit_button = page.locator(selector_submit)

        if not submit_button:
            raise Exception("Submit button not found")

        submit_button.click()

        page.wait_for_load_state("networkidle", timeout=timeout)

        response_elem = page.locator(selector_response)
        if not response_elem:
            raise Exception(f"Response element with selector '{selector_response}' not found")

        response_text = response_elem.text_content()

        print ("Output: ")
        print (response_text)

        response_md = markdownify(response_elem.inner_html())
        print ("Markdown:")
        print (response_md)

        if not response_text:
            logger.warning("Response element is empty")

        write_output(response_md)

    except Exception as e:
        logger.error(f"Scrape failed: {str(e)}", exc_info=True)


def main() -> None:
    # Setting up basic camoufox, no need for anything fancy to unblock ChatGPT yet.
    # https://camoufox.com/python/usage/
    # Setting it up with a rotating proxy
    with Camoufox(geoip=True,
        proxy={
            "server": proxy_server,
            "username": proxy_uname,
            "password": proxy_pass,
        },
        headless = True, #False to see the browser in operation.
    ) as browser:
        page = browser.new_page()
        # Beggining the scrape in the scrape() function
        scrape(url, page)
        # Closing the browser
        browser.close()


if __name__ == "__main__":
    main()
The Pros and Cons of Writing Your Own Scraper
So this is how you can code your scraper for ChatGPT responses. However, this method isn’t the only one, nor is it without downsides.
| Pros | Cons |
| Cheap: if you know how to code, it’s essentially free. | High barrier of entry: not everybody knows how to code, and it’s not a trivial skill to master. While extremely useful, LLMs are still brittle for anything of scale. |
| Endless customization: again, if you know how to code, you can built your scraper to be whatever you want it to be. | Low scalability: you’re going to need to write a scraper for every website you want to scrape, which is a big task. |
| Full control: when you control the code, you’re not at the mercy of whatever wrote it. | Access restrictions: websites today can have all sorts of bot protection measures, like Cloudflare and login walls. You’re going to need to figure out how to bypass them on your own. |
| Reaction speed: you can troubleshoot your scraper as soon as any problem arises. | Maintenance: if the target changes and breaks the script, you’re the one who’s left with the task of making it work again. |
Method 2: Scrape ChatGPT Using a Commercial Scraper
Sure, you can scrape ChatGPT on your own with a little bit of gumption and coding skill. However, you’ll still need proxies, the ability to bypass Cloudflare and other challenges that ChatGPT may throw your way. This isn’t a trivial task.
An alternative is to use a ready-made web scraping API. As we outlined in the comparison table, writing your own code has plenty of downsides that a ready-made scraper doesn’t share.
To illustrate the point, I’ll use Decodo’s ChatGPT scraper – after all, the provider showed some of the best results for scraping ChatGPT when we tested the service for our 2025 Scraping API report. It also offers a dedicated API for this target, which simplifies the setup.
The Benefits of Using a Commercial Scraper
- Ease of setup: while our example setup describes entering but a few lines in the command line, this assumes that all goes well. It may not – even on Mac, you may still encounter issues with getting just Camoufox installed. Pre-made scrapers, on the other hand, accept simple standardized API calls. In addition, they come with a playground that is immediately accessible both for generating code and extracting responses (albeit not at scale).
- Built-in options: Many products allow customizing your location, device, and whether you want ChatGPT to use web search. They also support multiple output formats, including JSON, Markdown, XHR, or plain HTML.
- Much more scalable: The scraper automatically handles headless browsers, anti-bot systems, and proxy servers on its end. Your only worry will be to send API calls and store results.
Using the Commercial ChatGPT Scraper Step-By-Step
1. Create an account and subscribe to Decodo.
2. Navigate to the scraper API playground where you can fiddle with the scraper settings:
- enter the prompt (I reused “What are the top three dog breeds?”);
- choose the output format (Markdown, in this case);
- toggle ChatGPT’s web search function on or off;
- set geolocation and device type.
On the right, you toggle the format tab to Python to immediately get the code.
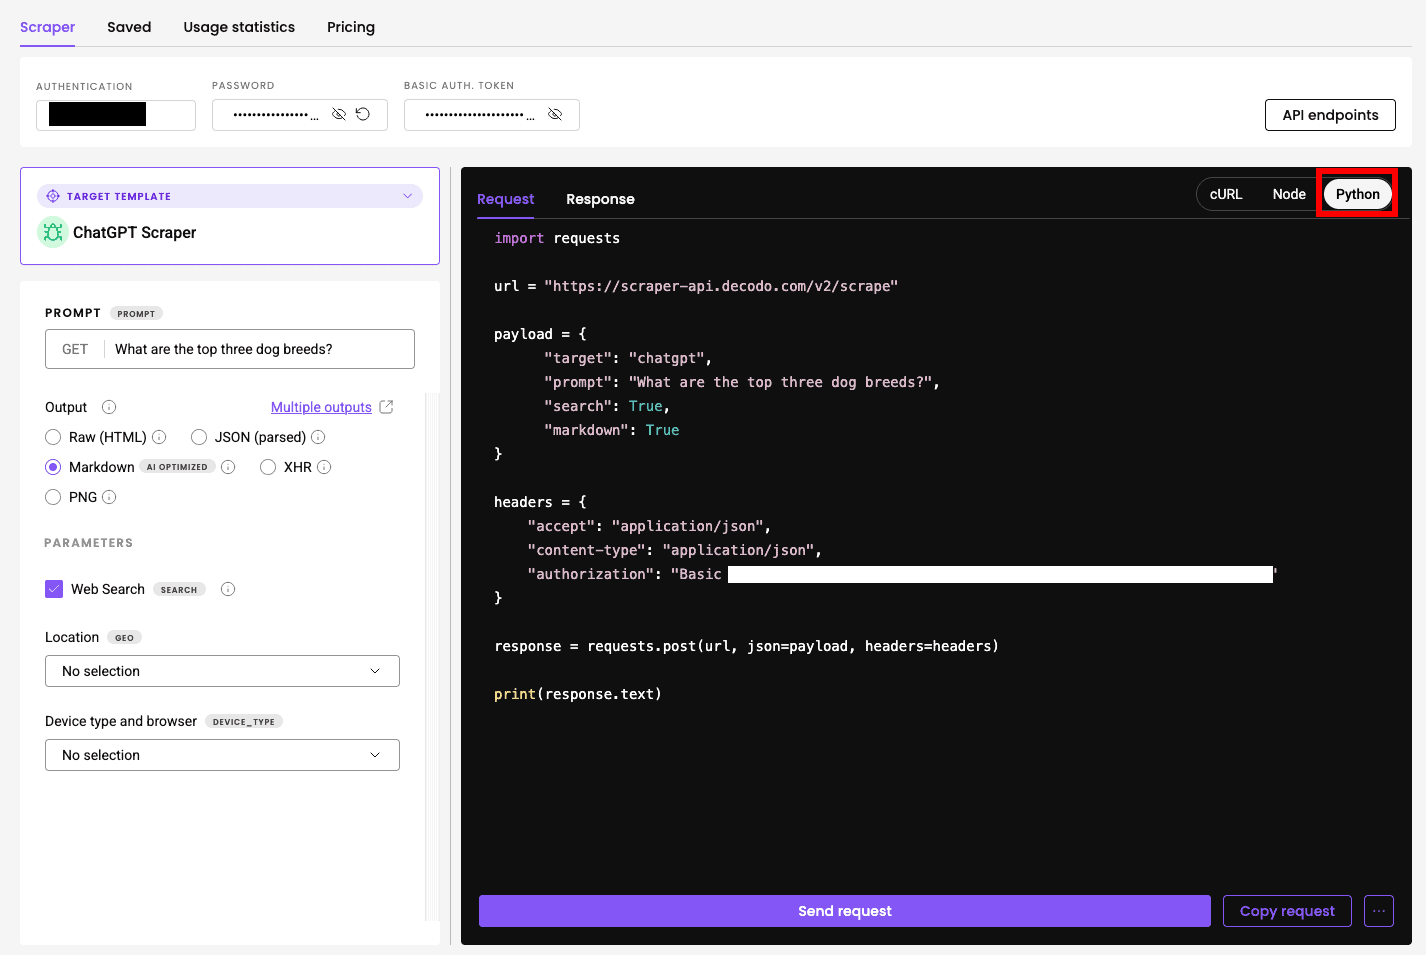
3. You can now click Send Request to see whether the code works or Copy Code to start using it for your own purposes.
4. Paste the code into a word processor and save it with the .py extension. I called mine “chatgpt_scraper.py”, just like in the first example.
5. Open the command line tool, navigate to the file location, and enter python3 chatgpt_scraper.py > response.txt.
- The appended > response.txt will create the response.txt file in the same folder and save the scraped response in it every time you run the code.
- Use >> response.txt if you want the file to be updated rather than overwritten every time you run the code.
The Full Code Example
Here’s how the code for the same prompt we used in the code writing example looks – minus our authorization data:
					import requests

url = "https://scraper-api.decodo.com/v2/scrape"

payload = {
      "target": "chatgpt",
      "prompt": "What are the top three dog breeds?",
      "search": True,
      "markdown": True
}

headers = {
    "accept": "application/json",
    "content-type": "application/json",
    "authorization": "XXX"
}

response = requests.post(url, json=payload, headers=headers)

print(response.text)
